How to attach foldaway lightweight gaiters to your hiking shoes
For those of you who know Al, you’ll know that a) he loves a good gadget and b) he really likes making tweaks and improvements to gear until it’s ‘perfect’. Today’s Gear Hack is no exception.
In this post we’re going to look at running gaiters, why you should use them, and how you can ‘stow’ them on your hiking shoes so they’re there when you need them (and out of the way when you don’t!). This lil’ animated GIF shows us what the end result of today’s post will be:

Gear Hacks: Foldaway Gaiters For Your Hiking Shoes
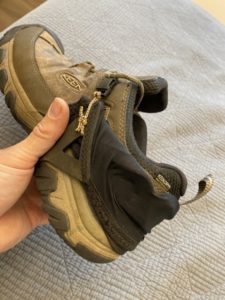
I love my Keen hiking shoes. I could have gone with the full-blown high cut hiking boot in the same model, but given I knew I’d be wearing these shoes pretty much non-stop for months at a time both on the trail and in the city, I wanted something a little less chunky. The low cuts seemed like a great compromise. And they’re great around town – they don’t scream out ‘I’m a hiking nerd’ too loudly, and I feel like I can wear these pretty much everywhere aside from when we want to get gussied up.
The only complaint I’ve got with the Keen’s is that they seem to be a stone magnet as soon as you get out on any sort of non-paved surface. When I first got them I was forever asking Michelle to wait a sec while I retrieved a pebble, or a stick, or some sand out of my shoe. It seems that if there’s a stone out there, it’ll find its way into my shoe. And maybe I’m like the Princess and the Pea when it comes to stones in my shoes, because even the smallest little piece of grit has me unlacing my shoes.
Clearly I needed a solution. While I could use my ‘regular’ hiking gaiters to keep those pesky pebbles at bay, wearing my full gaiters left my ankles and socks drenched in sweat on even the shortest of hikes, and the heavy nylon material is none too comfy on my bare calves when I’m wearing shorts. These weren’t going to work long term as an every day solution.
Keen + Salomon = A Pebble-Free Experience!
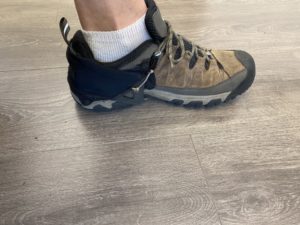
So I started researching gaiters. I was looking for something super lightweight, compact and breathable, that I could take on and off easily. Gaiters made for trail running met all of these criteria, and the best of the bunch for my purposes were the Salomon low-cut trail-running gaiters. Simply slip them around the bottom of your shoe, wrap them around your ankle and voila, a pebble-free hike awaits!
(I also tried the Altra Trail Gaiter, and while they’re definitely light and small and breathable, they are specifically designed for Altra shoes: the shoes have velcro patches on their heels which hold the gaiters in place. For non-Altra shoes, the gaiters come with small adhesive velcro patches that you stick onto your heels. But in practice, these only stay stuck for a week or so, meaning the gaiter would ride up on the back of the heel, at which point the pebbles would start leaping into my shoes again).
Missing in Action
These Salomons were fabulous! Except… invariably I wouldn’t have them with me when a hike broke out. We’d be walking down a sidewalk somewhere, and suddenly Michelle would see a trail branching off. ‘Ooh, let’s see where this goes,’ she’d say, and next thing you know it’s pebble-o-rama in Al’s shoes… with my gaiters safely sitting at home. Clearly I couldn’t be trusted to have the gaiters with me when I needed them, unless I was prepared to wear them at all times. Unless…
The Solution: Foldaway Gaiters
….Unless I could find a way to attach them to my shoes, so I could put them on at an instant’s notice, and fold them away when not needed.
Hence today’s Gear Hack was born. I present to you… Foldaway Running Lightweight Running Gaiters For Your Hiking Shoes. (Clearly I need a snazzier name. Anyway…)
Here’s a step-by-step on how to hack up your own set.
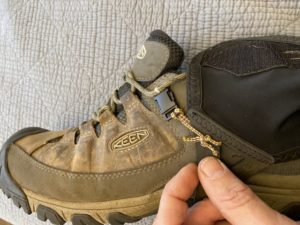
Step One: Add Parachute Clips to Your Shoes
*This hack should work on most shoes, but the attachment technique might need to be varied slightly.
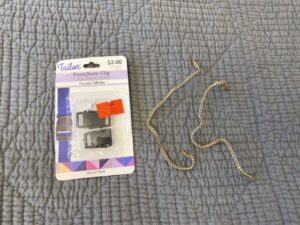
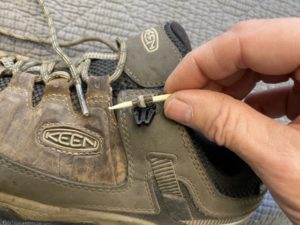
While ultimately I plan to ‘permanently’ attach the gaiters to the shoes, I still like the idea of being able to remove them occasionally for cleaning, getting on planes etc. So I added a parachute clip like the ones pictured to the design.
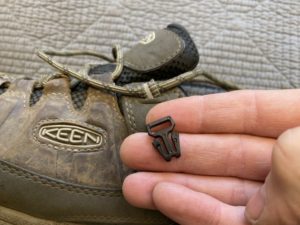
With my Keen’s, the top eyelet is a nylon loop. Remove the shoelace from this eyelet and slide the male end of the parachute clip over the loop, then reinsert the shoelace. The lace keeps the clip in place on the loop.
Repeat for both sides of both shoes (4 clips in total).
Step Two: Attach the Gaiters to the Clips
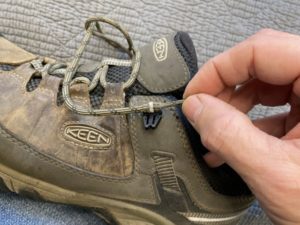
Attach the female end of the clip to the male end, then attach a short (10 cm/ 3 inch) piece of thin nylon cord to the clip using a girth hitch. Repeat for all four clips.
Install the gaiter onto the shoe. Pull the gaiter tight and tie the cord to the triangle section of the gaiter using a simple square knot.
(If you opt to not use the parachute clip, simply feed the cord through the first eyelet of your shoe, and tie it directly to the triangle sections of the gaiters).
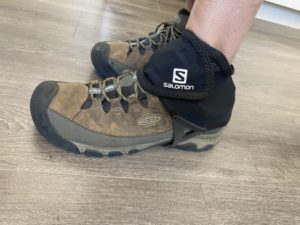
Step Three: Fold Away the Gaiters
All that’s left to do now is fold away the gaiters until they’re needed.
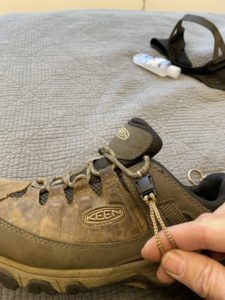
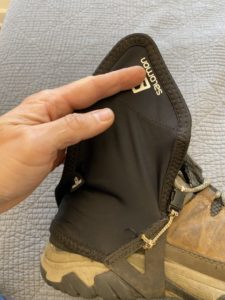
Starting with the inner side of the shoe (with the Salomon logo), fold the gaiter inwards on the velcro once.
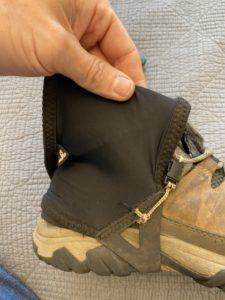
Tuck the folded section into the bottom section of the gaiter, with the frontmost section under the triangle section and the cord, and the rearmost under the elasticized heel section.
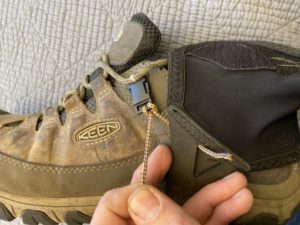
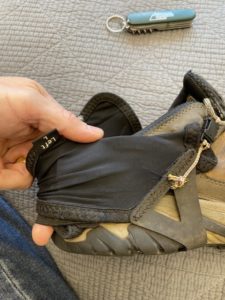
Repeat the process for the outer side of the shoe. The rear of the gaiter can be left unfolded, or you can fold down once to make the gaiter even more compact. Play with the folding technique until you find something that works for you.
That’s it! Now go out and enjoy those hikes. Your feet will thank you!